
-

Selecting the appropriate backpack capacity is a balancing act. You need to carry all the essentials into the backcountry without going overboard. An oversized backpack with lots of non-essential stuff equates to extra weight and slower going. When buying a backpack for hiking or backpacking, there are two primary considerations: 1) How many nights, if any, you’ll typically be spending outdoors and 2) The time of year you’ll be taking most of your trips. If you just enjoy day hikes, a daypack should suit your needs. If you enjoy weekend backpacking trips in the summer but rarely stay out for more than two nights, you can get away with a mid-sized frame backpack. If the duration and season you choose varies, you’ll need to choose a pack that is adequate for your longest potential excursion.
Keep in mind that you can always use a larger backpack for shorter trips. However, if you buy a backpack that is too small, you may end up having to buy a larger pack if you decide to do a longer trip in the future. Of course, if you know you’ll probably never be out in the wilderness for more than two nights, you don’t necessarily need a pack designed for extended trips.
Here are some general backpack capacity guidelines:
Duration of Trip Season Best Pack Volume Cubic Inches Liters 5 Nights or More Summer 4000-5000 65-80 Spring/Fall Over 5000 80-90 Winter Over 5000 80-90 3-5 Nights Summer 3000-4000 50-65 Spring/Fall 4000-5000 65-80 Winter Over 5000 80-90 1-2 Nights Summer 2500-3000 40-50 Spring/Fall 3000-3500 50-55 Winter 4000-5000 65-80 Day Hike Only Summer 1500-2000 25-35 Spring/Fall 2000-2500 35-40 Winter 2500-3500 40-55 Note: Keep in mind that hiking and backpacking in very cold conditions requires additional layers of clothing, thicker sleeping bags, etc., which requires more capacity. Also, some hikers eat more food and/or wear larger clothing, which may also require slightly more capacity. If you’re a big, tall person, consider going up a size on your backpack.
-
Backpacks fall into two primary categories: framed and unframed. Backpacks with a frame usually offer greater carrying capacity. A frame also transfers pack weight to the hip belt more efficiently, which (when used correctly) takes pressure off the shoulders and upper back, making it easier to carry heavier loads for longer distances. Of course, packs without a frame also have advantages.
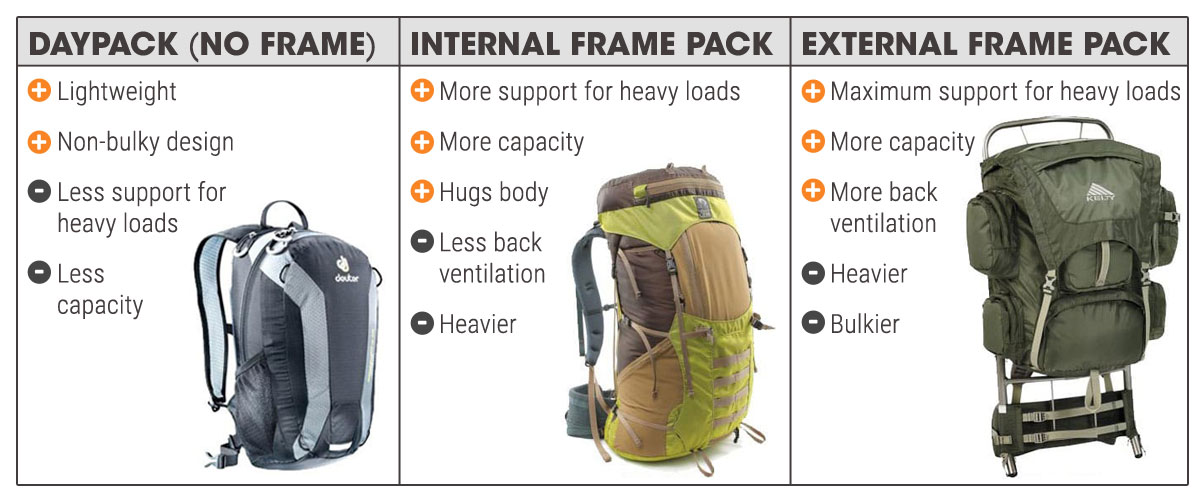
Unframed Backpacks
Weight is the primary advantage of having a backpack with no frame. Most backpacks without a frame are simply going to be lighter than comparably-sized packs with a built-in frame. Daypacks designed for hiking are a great example. These lightweight packs are available in a variety of sizes, from compact to moderately large. However, if you need to carry heavy, bulky gear, a framed pack is definitely the way to go.
Internal Frame Backpacks
An internal frame backpack typically has two individual, semi-flexible “frame stays” built into the back panel. These frame stays are often flat, narrow, pre-shaped aluminum bars, which give structure and support to the pack. Some packs may also include a “frame sheet,” which is a semi-stiff piece of material found inside the back panel. Some packs have frame stays and a frame sheet. Internal-frame backpacks hug the body more than external-frame packs. This design provides better balance and easier movement, two benefits that really come in handy on the trail.
External Frame Backpacks
External frame backpacks have been around longer than internal frame packs. This pack style features a robust, tubular metal frame that supports the pack from the outside. Although they’ve become less popular over the past few decades, external frame backpacks can potentially offer more ventilation between a person’s body and the backpack, which is a nice benefit in hot, humid conditions. An external frame also makes it easy to strap on bulky gear that may be too large or oddly shaped to fit inside the pack, which is why some hunters and military personnel still prefer using an external frame backpack.
-

Choosing a backpack that is the correct size for your body will make a tremendous difference over the long haul. For the most comfort and ease of movement on the trails, the majority of your backpack's weight (about 80%) should rest on your hips, not your shoulders. To achieve this, you’ll need to size your backpack correctly and make the right adjustments to your hip belt and straps. Figuring out your ideal pack size can be a little trickier than sizing a pair of shoes. To get started, you’ll need a tailor's tape or another flexible measuring tape. Note: It helps to have someone assist you with the measuring.
Torso Length
Torso length is the length from the prominent bump at the base of your neck (the C7 vertebra) to the center point on your spine, between the tops of your hip bones. Find the top of your hip bones by running your hands down your sides until you first meet your hips at the iliac crest, then envision an imaginary line between your thumbs at the top of your hips along your back.
Hip Belt Size
Hip belt size is based on the circumference of your hips. Measure around your body, one inch lower than the iliac crest (the top of the hip bones). This measurement is less important than torso length, since most hip belts adjust to accommodate a variety of hip sizes.
Approximate Sizing for Packs (Varies by Brand and Style):
- Extra Small: Fits torsos up to 15"
- Small: Fits torsos 15" to 17"
- Medium/Regular: Fits torsos 17" to 20"
- Large/Tall: Fits torsos 20" and up
Important Note: The sizing guidelines above are intended to be a general estimation. It’s always better to use the specific size guidelines listed for each backpack when determining your ideal size (assuming multiple sizes are available). Also, be aware that these measurements are usually only included on internal-frame backpacks and external-frame packs. Because daypacks are much smaller, many manufacturers treat them as "one size fits all." Therefore, most packs under 2000 cu.in. don’t include torso measurements.
-
Once you’ve determined your ideal backpack size, you'll still need to make several important fit adjustments before you hit the trail. Always be sure there is weight in the pack before making these adjustments. Ideally, you should put about 15-20 lbs. in the pack, and try to fill most of the volume.
How to Adjust Your Backpack Fit
- Loosen the main straps: shoulder strap load adjusters, shoulder straps, hip belt, and hip belt load adjusters.
- Put the pack on and fasten the hip belt.
- Tighten the shoulder straps.
- Tighten the load adjuster straps.
- Shrug the load up high, then tighten the hip belt very snugly while still shrugging.
- Go back and readjust the shoulder straps as needed.
- Lastly, fasten the sternum strap to keep your shoulder straps pulled in snuggly. The sternum strap is not designed to bear weight, but merely to keep the shoulder straps in place. If this strap applies significant pressure across your chest, it's too tight.
Tips for Adjusting on the Trail
Follow these four steps to quickly readjust your load:
- Loosen the load adjustment straps.
- Shrug the backpack up on your shoulders.
- Tighten the hip belt (while the load is still being shrugged).
- Relax from the shrug, then retighten the load adjusters if necessary.
-

Some manufacturers now offer backpacks designed specifically for women, which may better accommodate a woman's unique frame. There are several features that differentiate a woman’s backpack from a unisex pack:
- Slightly narrower spacing between the shoulder straps.
- Slightly reduced pack width and profile.
- Different hip belt shaping, with narrower top and wider bottom to fit the "bell" shape of a woman's hips.
- Shorter torso length.
So, should women only shop for backpacks designed specifically for women and avoid unisex models? Not necessarily. Average-sized and tall women should still experience a comfortable fit from a unisex backpack. However, women with a smaller frame and/or narrower shoulders will probably benefit from choosing a women-specific backpack. That being said, the most important consideration is choosing a backpack that is appropriate for your torso size.
-
Backpacks run the gamut from simple rucksacks with a single large cargo compartment to high-tech packs with loads of bells and whistles. In this section we’ll cover some of the handy features to look out for, and we’ll explain the benefits of each.
Top-Loading vs. Front-Loading Backpacks
Generally, backpacks can be divided into two categories: top-loading and front-loading. Top-loading packs usually have a drawstring opening on top with a protective flap that straps down to cover the opening. Larger packs designed for hauling heavier loads almost always have a top-loading main compartment. Front-loading backpacks, which are usually smaller in size and capacity, have a zippered, U-shaped flap on the front of the pack. This design makes it easier to access items quickly, but is not ideal for carrying heavy loads. Some large, internal frame backpacks feature a top-loading main compartment with an additional front-loading access panel for the best of both worlds.
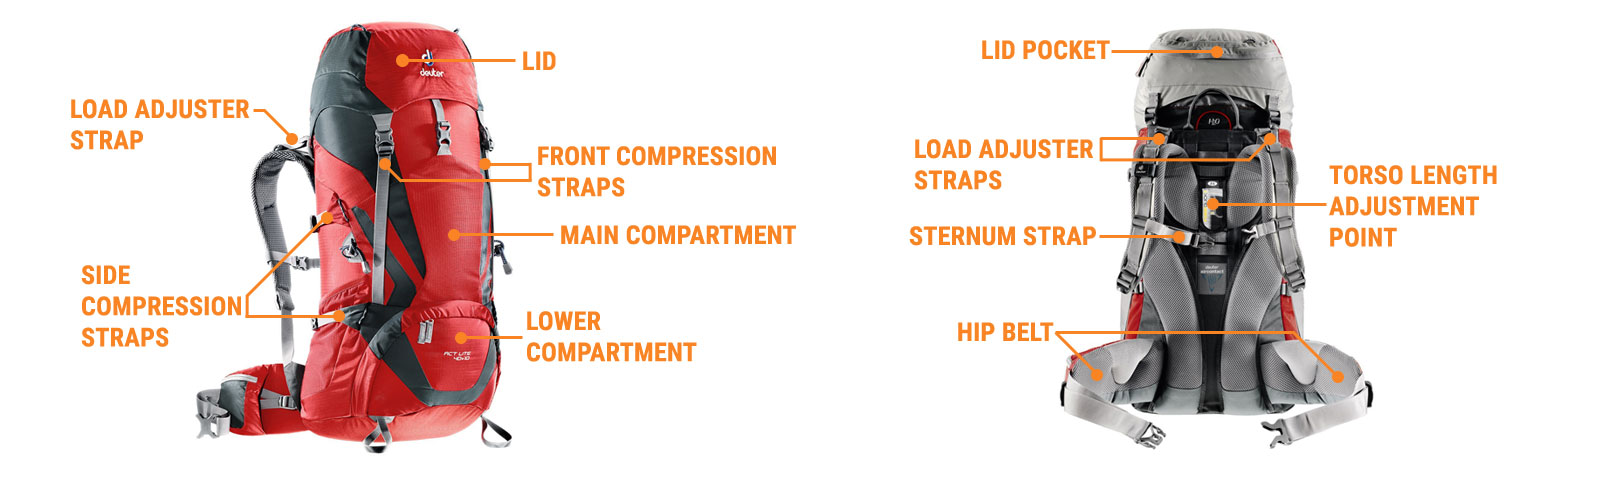
Backpack Frames
Most internal frame backpacks have either rigid, vertical structures called frame stays or a semi-rigid framesheet. Some have both. Frame stays are typically aluminum bars that maintain the pack's shape and keep loads evenly distributed. A framesheet is placed inside the back of a pack and is usually made of high-density polyethylene (HDPE) or another lightweight composite. The framesheet helps maintain the shape of the pack and prevents hard objects from poking you in the back.
Hydration Sleeve
Many modern backpacks are hydration compatible. There are several distinct features that make packs compatible with a hydration system:
- A special sleeve or compartment that holds a hydration reservoir.
- At least one drinking tube port near the top of the backpack.
- Some models also have a clip or loop on the shoulder strap to keep the drinking hose within reach.
Note: Although many backpacks are compatible with a hydration system, most do not include a reservoir. This allows you to choose a hydration system and reservoir size that will work best for your needs. If a hydration system is included, it will be noted as an extra feature in the product description.
Gear Attachment Points
Attachment points refer to areas on a pack where you can tie, hang or clip various gear. Parachute cord or carabiners can also come in handy for attaching gear. A few types of attachment points include:
- Daisy Chain: A series of small webbing loops running down the front of a pack, often used to hold carabiners and climbing gear.
- Ice Axe Loops: Large loops on the front of the pack that will hold an ice axe, piolet or similar tool.
- Trekking Pole Lash Points: Specifically designed to accommodate collapsed trekking poles.
- Ski and Snowboard Carry Straps: Some winter sport backpacks have straps designed to hold skis or a snowboard. This is a very handy feature for anyone who hikes or uses snowshoes to access hard-to-reach backcountry areas before switching over to their skis or snowboard. It’s also handy for carrying your gear to and from the parking lot.
Backpack Rain Cover
An integrated rain cover is an invaluable backpack feature for wet or snowy climates. The cover usually stows in a pocket on the pack for easy deployment when rain or snow starts falling.
Ventilated Back Panel
Some external-frame backpacks use a taut mesh fabric to create a pocket of air between your back and the pack. Many internal-frame packs use air channels in the back padding for breathability. Weight-bearing straps that touch your body are also frequently made of breathable mesh or moisture-wicking materials.
Detachable Daypack
Some larger backpacks include a detachable lid that converts into a lumbar pack or a front compartment that detaches to become a separate daypack. This is a great feature for extended backpacking excursions, when you'll want to do a little light exploring away from your base camp.
Compression Straps
Compression straps allow you to tighten down the load and keep gear from shifting as you hike. They are usually located on the sides of the pack.
-

- Try to place heavier gear in the middle or bottom of the pack. Avoid putting heavy items at the top, which can throw off your stability.
- Always prepare for the worst possible weather, even if it's not in the forecast.
- Plan your route ahead of time, and always tell a few people where you're going and when you plan to return.
- Have a map of the area and compass, and know how to use them.
- Bring ample water and a water filtration system or purification tablets as a backup. Research the area you’ll be traveling to determine where you’ll be able to access water.
- Research any potential hazards you might encounter in the area, including wild animals and insects. Be prepared for potential injuries with a first aid kit. Check out our First Aid and Outdoor Safety Guide for more info.
- Finally, check out our Backpacking Guide for even more helpful backpacking tips.